
Wanhao D7 FAQ’s
This page contains a lot of the common questions and answers related to the D7 Resin printer. If you have a question would like answered or have information that you would like to add to the Faq page, use the request form to send the information.
wanhao-d7
The NanoDLP image on this website has the operating system partition compressed so the download will be smaller. The last step on the instructions is to expand the partition to use the full SD free space. Please refer to this step on this page.
- Select Setup then Tools then Expand File system and wait a few minutes for the file system to expand and reboot then refresh your browser.

D7 NanoDLP Expand FileSystem
The idea is get the leadscrew into the coupler when installing about 1/2 into the coupler, tighten the setscrews to it. Now slide the coupler over the motor shaft until the 2 shafts mate inside the coupler. Now using your hand or just the hex key in the setscrew of the motor half side of the coupler, slightly stretch it down and tighten in the slightly stretched position. This pretensions it so that the 2 shafts are pulled together with force.
When the light on the HDMI board is blinking that means the board is not receiving any signal from the computer (or RaspberryPi).
- Check that the HDMI cable is connected securely
- Check that the PC is showing a second display. If it does not check the cables.
- Check the short HDMI male to female cable inside the D7 has not come loose. You can always try and bypassing this cable by plugging the HDMI from the PC directly into the HDMI driver board.
The best indicator is the green / blue light (different depending on the version) LED on the HDMI board (the board closest to the UV light, see photo below). Here is a description and possible causes based on the HDMI LED:
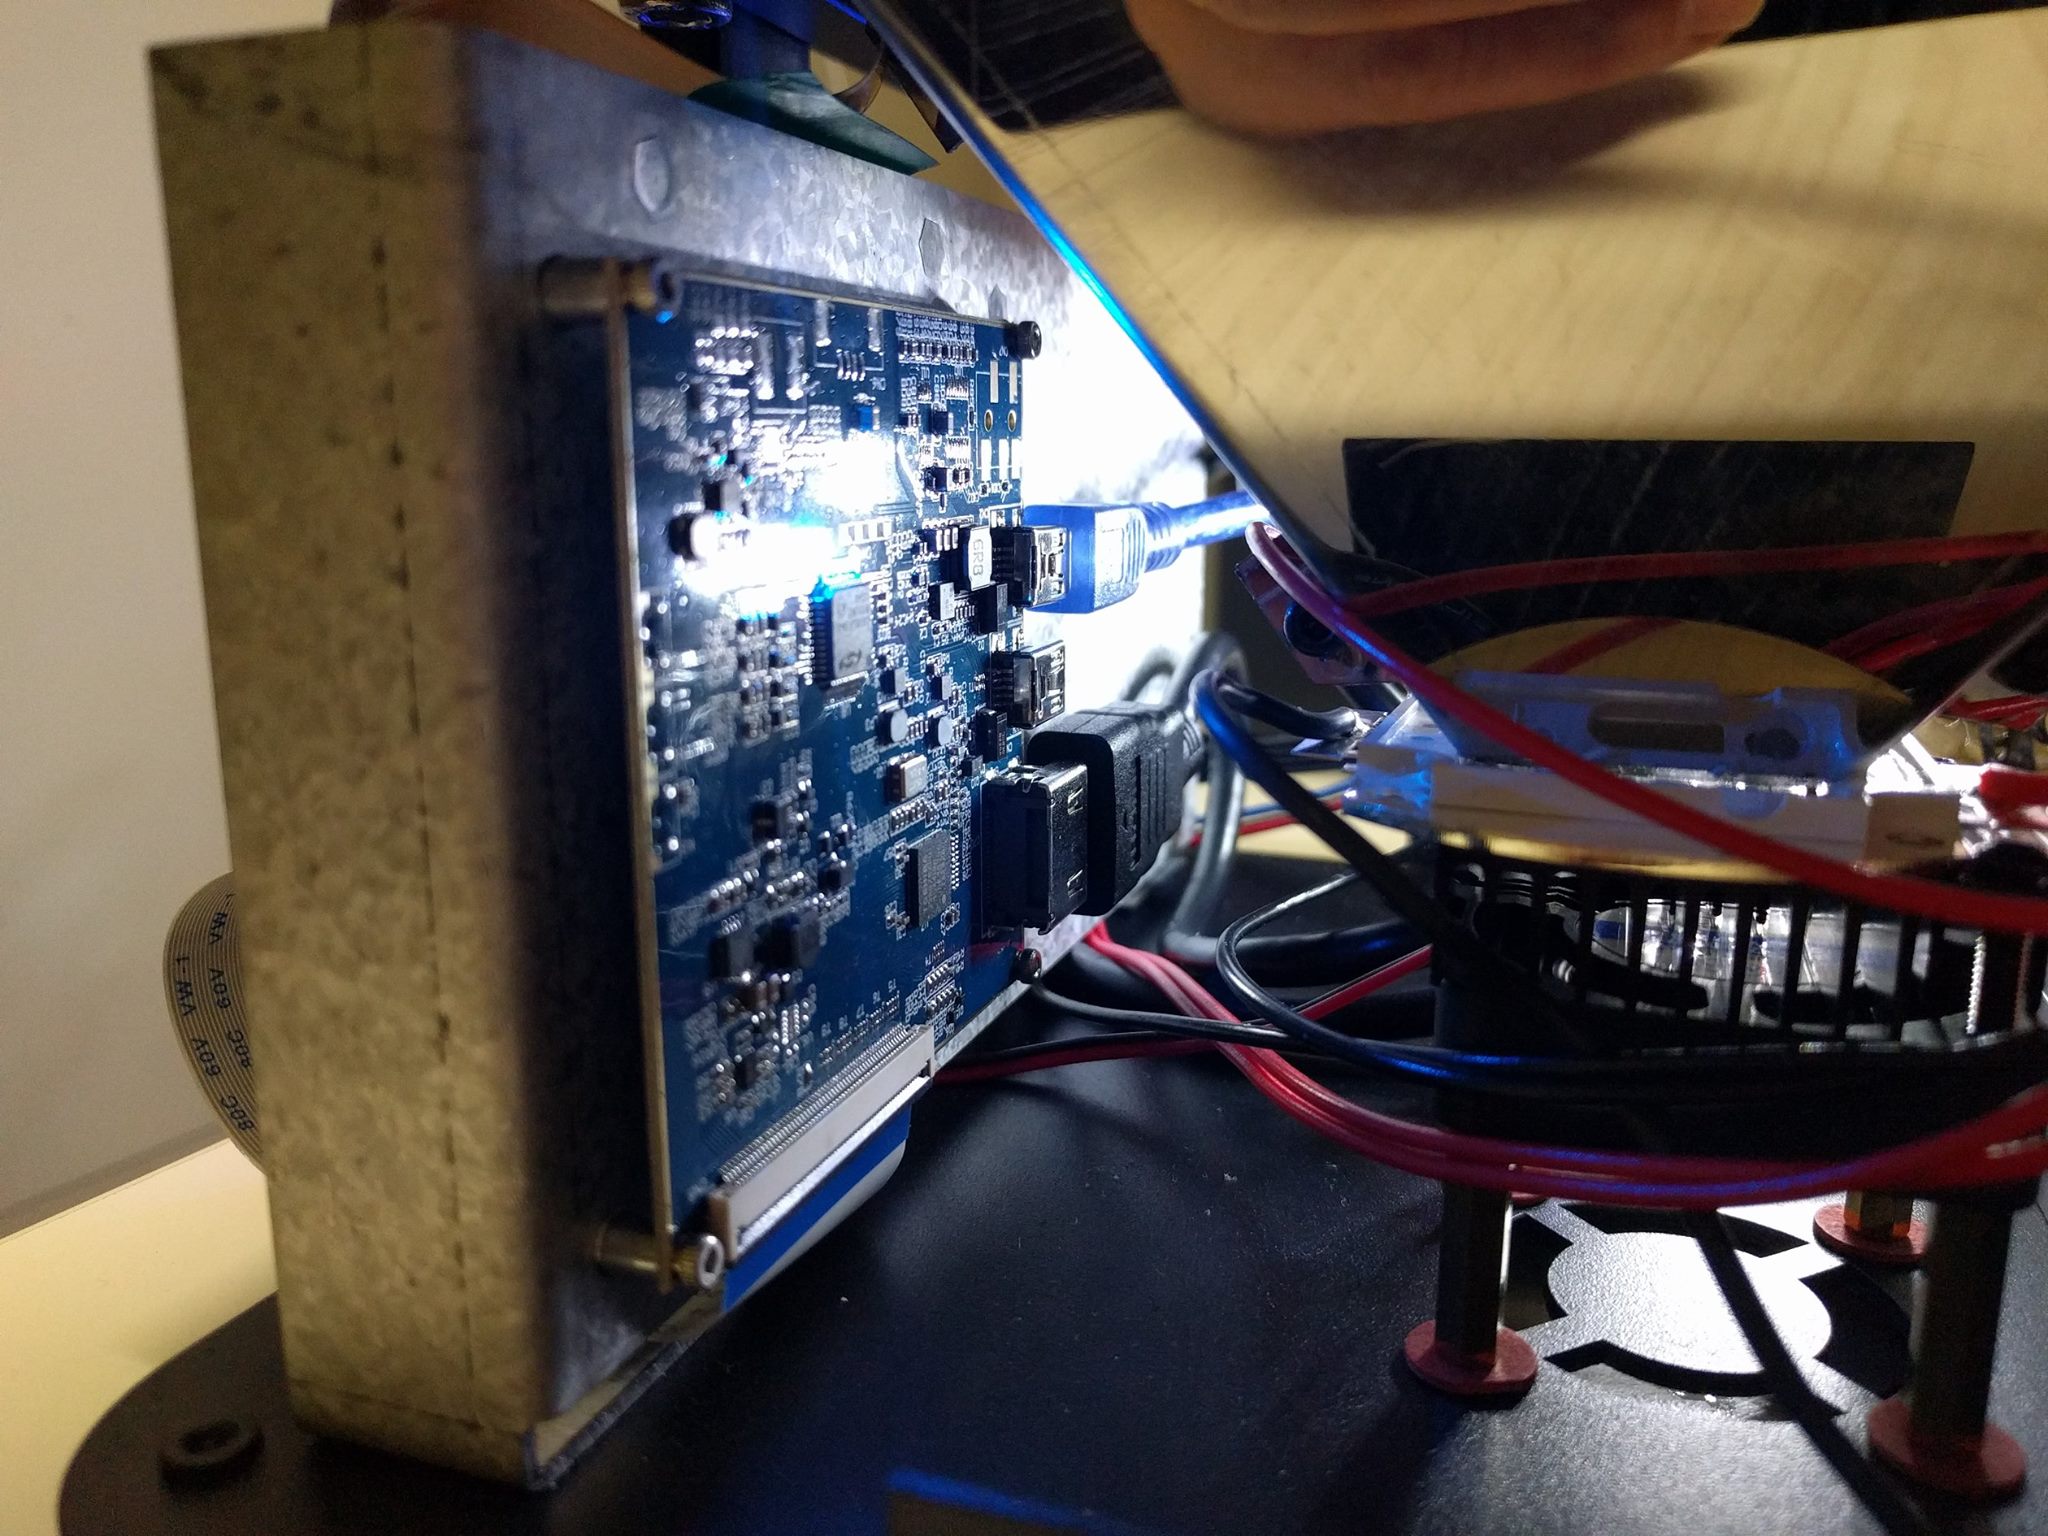
Basically the green indicator LED on the HDMI board has a few states:
- No light = no power, either the fuse onboard is blown or the system is not sending 5V power to the USB cable that plugs into that board. Test by using a different cable powered from a USB port on the computer.
- Flashing= board has power, but incorrect HDMI signal or no signal is present. Check the HDMI cables, the adapter cable plugged into the back of the board and the PC. You can also bypass the adapter cable and plug the HDMI directly into the back of the board for testing.
- Solid= good valid HDMI signal is being sent to the board.
The LCD module is very fragile and many units have been delivered with the LCD damaged during shipping. Check this page for photos and suggestions. The newest D7 units are now shipping with an acrylic backing plate on the LCD to help protect it.
- If the LCD shows a white circle when the UV is turned on (issue gcode M106 with terminal or use NanoDLP to turn on the UV Lamp) then it could have been damaged by pressure on that spot.
- If the LCD is showing half an image longways then the LCD cables could be loose. Carefully check them with instructions from this page.
- Check that the orientation of the secondary screen on the PC (if using) is set to Landscape.
Problem
Some customer received the printer and found both the PSU LED light and Motherboard LED
light blink. The motherboard blinks indicate there’s short circuit which triggers the protection
procedure. Therefore to find the short point and fix it would fix the issue.
Solution
The metal tabs on the UV LED are very close to the metal heat sink and have a possibility of shorting out. You can slightly bend the tabs (where the power wires are soldered on) up to get them further away from the heat sink. See the video below for an explanation.
Symptom
Print hangs before the first image is shown and appears to lock up.
Cause
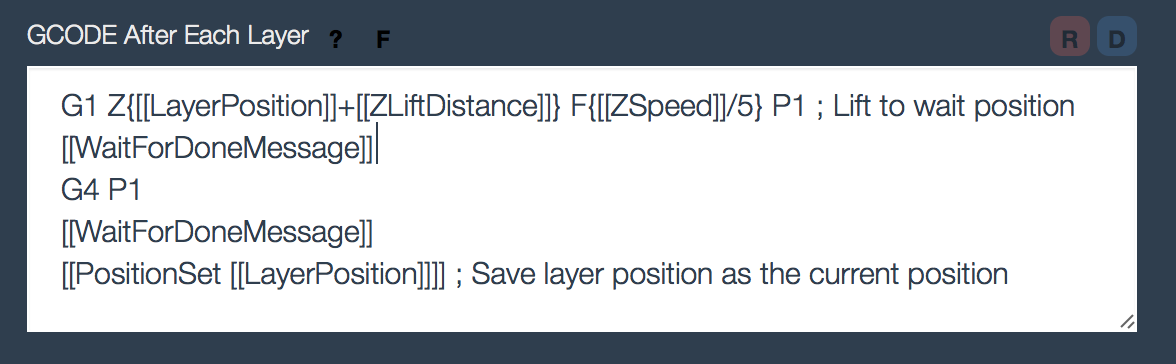
There were some old versions of the firmware floating around and also nanodlp and printer profiles. If they are not matched up then the nanodlp profiles may be waiting for a response back from the D7 and if it does not get it the first image will not display. Make sure you are using the latest versions of both from the following page: NanoDLP Easy Installation. If you want to check the version of firmware you are using you can issue the M115 command from the NanoDLP Tools->Terminal window and click Send. If the firmware version reported is equal to or greater than DEVEL-1.0.2 *and* nanoDLP has a G4 P1 in the “GCode After Each Layer” section, then there will be a problem.
If your printer resin profile looks like this (below with the extra G4 P1 and WaitForDoneMessages) then you will need to update it to use it with the latest firmware *or* be using an older version of the D7 firmware:
Problem
The initial bed / LCD size was set incorrectly in the slicer or nanodlp for the D7. Prints are oval or incorrect XY size.
Solution
NANODLP
Based on the LCD screen information with an active area of 68.04 x 120.68 mm and 1440×2560 pixels I believe the X and Y pixel size should be 47.25. If you are using the old numbers shown below and your print size is off slightly then you can try the new numbers.
Y of 68.04mm * 1000 / 1440 = 47.25 and X of 120.68mm *1000 / 2560 = 47.25. This Pixel Pitch also matches the pixel size shown in what we think is the LCD Spec (the (H) number will by x3 since it is RGB):
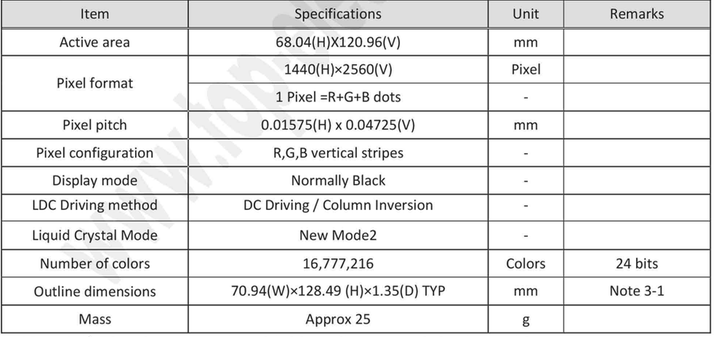
D7 LCD Specs
Old information (for reference/history only): Nanodlp you enter 46.875 microns for X and 47.222 for Y. Formula is LCD mm * 1000 / LCD Resolution, i.e.: 68mm*1000/1440 = 47.222
The older version of nanodlp would use one value for both x and y. After upgrading and going into setup it will want you to enter a value for Y, I just coped the X over to Y.