
Extruder PID Tuning
Description
The default heat manager for the i3 printer is using the DeadTime method which usually works pretty well. I found that I had to change the PID Gain / Deadtime setting to 3 to get better results without the over an undershooting of the temperatures.
The heat manager can also be changed to use PID which can yield better results after running the PID Tuning command for a set temperature. (PID is a control loop feedback mechanism with many uses. A general description of PID is beyond the scope of this article. ) Tune the PID control system to the temperature you most frequently use. If your printing temperature varies greatly (for example, you print low temperature PLA as well as higher temperature ABS or PETG), you may find that tuning somewhere in the middle will work but you will likely have to re-run the tune for the new temperature each time you make a drastic change.
Changing and tuning the PID control is a means of addressing unstable temperatures. If you do not have temperature fluctuations, then there is no need to do this. If it’s not broke, don’t fix it!
Method 1: Automated Tuning using GCODE
The most simple way of performing a PID Tune is to “print” a gcode file that executes all of the commands automatically.
Note: These files are for the Duplicator i3 and are reported to NOT work with the i3 Plus.
- Download the PID GCode file below for the temperature you would like to run your extruder at (right-click and select Save File or Download Link). These files will automatically change the EEPROM settings to use PID and also change the Max Drive settings to help get to the higher temperatures that some have reported having problems reaching.
- Turn your fan on manually to the desired “Normal” printing speed before printing this file.
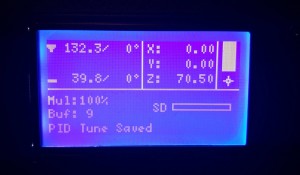
- “Print” the file just like any other gcode file, from the SD card or a host program such as Repetier-Host, Octoprint, etc. It will show the progress on the screen and when it has completed you are set to go.
Method 2: Tuning using Repetier Host
- Using Repetier Host go into the EEPROM settings and change the Ext1. Heat Manager to 1 and then save the settings (or use the LCD menu and go to Configuration->Extruder and change it there the save the settings to EEPROM )
- With the extruder at room temperature we will need to issue the PID Tuning command. This consists of the Temperature that you want to reach (print at) and the number of cycles of tuning to run. Go to the Manual Control tab. In the GCode box type: M303 S220 C5 where Sxxx is the temperature you want to use (200, 210, 220, etc) and Cx is the number of cycles to run then press Enter or Send. (Note: Some older versions of the firmware take a P instead of C for the number of cycles. If it doesn’t like it you can leave it off and it should default to 3 cycles.)
- Once you hit send, the auto tune function will take about 15 minutes to complete. You will see the following information in your log appear multiple times with different numeric values (Note: Your values will be different!):
bias: 103 d: 103 min: 147.98 max: 152.02
Ku: 65.06 Tu: 30.67
Classic PID
Kp: 39.04
Ki: 2.55
Kd: 149.66 - Wait until you see the message about PID Tuning being complete or having finished. You will see one last set of numbers. The values you are looking for are Kp, Ki, and Kd. Write these values down, they will be your new PID values.
- You can use the EEPROM menu to enter these values to the Ext1. P-gain, Ext1. I-gain and Ext1. D-gain (the kp, ki, kd values respectively) or enter the following two lines of code as we did earlier, substituting your values for the ones below:
M301 P39.04 I2.55 D149.66 (press Enter or click Send)
M500 (press Enter or click Send)The “M301” command sets the values to the running configuration, and “M500” saves that configuration to EEPROM.