
This page contains a lot of the common questions and answers related to the Wanhao D5 Series of printers. If you have a question would like answered or have information that you would like to add to the Faq page, use the request form to send the information.
wanhao D5
Short answer is simply that it is practically impossible, it will be easier to build a whole new printer (or just buy a Di3 or D6).
You would need to replace everything from the extruder system at the back, to the head and nozzle, and then configure firmware for the required settings (at present there is no public source for the firmware).
Although usually not required, it is semi possible with the D5 series – you need to add a line to your start gcode.
The G-code that will enable the overwrite of the firmware setting is M92.
Setting the e-steps/mm for example (the default) would be: M92 E350.8
On the new firmware, the firmware does not load the EEPROM values. Until that change have been made, it is not possible for the printer to remember your PID settings, however you can add a line to your starting gcode which will temporary set the values (until printer restarts).
M301 P23.5 I0.51 D269.13
You would get these (your specific) values, after running a PID tune with software like Repetier Host.
Do not use grease on the D5 (as mentioned by Jetguy):
#1 the stock bushings are sintered brass on the slider blocks of the D5 series. They MUST be that because the outer rods both turn and slide.#2 heavier machine oil is preferable to grease because grease plugs up the pores in the sintered bronze.Sewing machine oil is probably the best thing in common use that would work. It is specifically formulated NOT to gum up like other oils and grease and become sticky over time. You apply some to a paper towel and rub down the rods. You do not need to go nuts and put too much oil on.Further, periodically take a dry paper towel and wipe the rods to remove the black contaminated oil from the rods, then wipe with a fresh paper towel and oil.
Layer not sticking is most of the time a bed leveling issue.
Bed Leveling is not only the part to get it about the thickness of a paper from the nozzle, but also adjusting afterwards to ensure optimal layer adhesion. For a 0.2mm layer, you need to get the bed that distance in the position the nozzle will be when it prints the first layer (while the printer is printing the first layer – which is why we use extra lines of the Skirt/Outline option). This is the difficult part (some slicers use your leveling as the first layer gap, others add the set first layer height on top of your leveling gap [for these you need to account for it]).
Half of the first layer height, is how far off you can be from the ideal gap as an absolute max (for 0.2mm layer height, that is between 0.1 and 0.3mm). The Di3 uses M3 screws with a pitch of 0.5mm for bed adjustment – 0.1mm difference is only 1/5th of a turn.
The Di3 have one very big weakness: The X axis does not stay level. Since it have 2 motors, they can move independently while powered off (or disabled). Leaving the printer off or steppers disabled for more than a few hours is enough to have it shift slightly. I use http://www.thingiverse.com/
Bad filament can cause similar issues, but usually you can level a bit closer and it will still stick.
A glass plate is a very good idea and recommended – Adding a glass bed
Yes, your printer have the holes for the end-stop adjustment and thus adding the glass should be easy.
Placing the glass on top of the buildtak, not ideal (especially if you want to use the heatbed for PETG or ABS) – the buildtak on the printer have a paper based glue, which is very insulating. Real BuildTak is a vinyl type of product which conducts heat easier.
The easiest way to remove the buildtak on your bed:
- Heat it to about 50C (no need to heat the nozzle too), but leave it for a few minutes at 50C (so that the heat can get everywhere).
- Now carefully and slowly start peeling in one corner.
- If glue remains in a spot, you are going too fast (this takes patience, on my second try it took about an hour or more).
- After you have the whole sheet off, there might be residue spots left, using the glue side of the sheet, stick it on top of the residue spot (rub it a bit) and peel that part again (don’t stick the whole sheet, only a small part) – this should lift the residue off in no time.
Peeling it off cold will result in a mess (this is what happened on my first try – took 3 days to clean, and it left scratches from the cleaning).
This is usually caused by a thermocouple wire not making contact on the amplifier board (located above the heat inside the pipe). The wire can be broken or just came loose.
Thermal Runaway can mean 1 of 2 things:
- Your nozzle is way hotter than the firmware expects (highly unlikely)
- Your thermocouple (the thing right at the nozzle) have an issue.
The firmware reads the temperature quite a few times and then average this to display, however if one of those reads produce a temp higher than the maximum set in the firmware, it shuts down and show the thermal runaway (the printer thinks its lost control over the nozzle temp).
On mine this error was caused by the Thermocouple Amplifier (which is located inside the black pipe right above the head) – if the wire is loose or fails to make contact, the amp will report a very high temp.
The previous firmware was a lot more lenient regarding this, but this firmware is very strict (in that it will not wait to confirm if it was a read error – it just terminate). Ultimately there is an issue which is best to get it fixed asap.
A photo of what the thermocouple amplifier board looks like
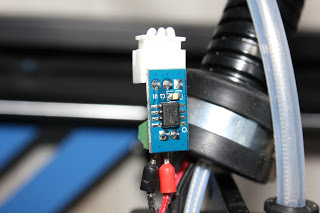
D5 Thermocouple Amplifier
Nozzle: The nozzle is unique to the D5 series. When you need to replace you can buy a stock nozzle or a MicroSwiss D5 Nozzle (available in 0.4, 0.6, 0.8mm nozzles).
Remember you also need to get a new PEEK Isolator and Threaded Metal Isolator Tube with every nozzle change.
Filament Guide Tube: The tube is standard PTFE tube with a 4mm ID and 6mm OD.
Filament Guide Tube Fitting: This fitting is a pneumatic fitting with the following specifications – 6mm tube straight, 1/8″ thread. The tube needs to be able to go through the fitting (and not stop inside). A product code that matches PC6-01 Straight.
Power Supply: this is a standard 120W @ 19V laptop power supply brick with a clover power input and a 2.5mm center pin DC connector output.
Nozzle Thermocouple: This is a standard k-type thermocouple. Remember to never solder wires of a thermocouple, they need to be crimped or placed inside screw terminals.
It stands for Steel Frame.