Easy Install Method
You will need a RaspberryPi3 to run Nanodlp on and a 8gb or greater SD card. The following kit contains a Pi3, proper power supply and enclosure or the pi3 board only. You can pick up pretty much any micro SD from a local drug store or order from one of the links below.
The Nextion display can be added to the pi also and will give you a touch screen with menus and status screens. I am working on instructions for it. Here is the part if you want to order the screen:
I have created a compresses sd image of the latest raspberrypi, nanodlp and a few utility scripts that can be downloaded and installed. This image also contains all the resin profiles that I have been using and is pre-configured for the D7 LCD, serial port and commands. You will need to download and install the updated firmware to use with Nanodlp. The latest D7 firmware image has all the latest changes that matches the current nanodlp sd image here. Stephen Shimatzki has prepared a video showing the install process for updating the D7 firmware (via source code, see this page for updating from the hex file) and how to download and copy the Nanodlp image to the RaspberryPi3.
If you have already installed an older version of NanoDLP you can look at the changes required to the printer profile and resin profiles so the latest version of the D7 firmware v1.3 (installed from this website) will work with it.
The latest NanoDLP raspberrypi image dated 0517 has the new profile changes to remove the extra z_move_comp messages and has the latest (at the time) nanodlp binary. I2C is enabled and the secondary cooling fan is turned on at startup (it is also turned on when the UV is enabled. If you want the fan to only come on once a print starts remove the startup fan command M106 P1 S255 in the Boot section).
or
- Download and update the D7 to the modified firmware for nanoDLP (can still be used with CW) D7 Firmware v1.3. The recommended way is using the Hex file or you can see video from above you want to compile from source.
- Download the Pre-configured RaspberryPi SD Image (with new z_move_comp changes dated 5/2017) (or mirror on Dropbox here) with Nanodlp setup for the D7 along with some Resin profiles.
- Extract the sdcard.img from the nanodlp_d7_0517.zip file
- Copy “burn” the sdcard.img file to a 8/16/32gb micro sd card using one of the methods found on the RaspberryPi installation page.
- Remove then re-insert the SD card in the computer so you can edit the Wifi credentials (or skip if you will be using Ethernet).
- Edit the /boot/wpa_supplicant.conf file on the SD (Add your login info within the “”). Please note that if you are using TextEdit on a Mac you will need to make a change to your preferences before editing anything with Quotes. See the file for instructions.
- Add your SSID and Password to the file as shown in the file (Make sure to remove # from beginning of lines to enable!). Save the file then eject the SD.
- Remove the SD card and insert into a Pi3.
- Connect the HDMI cable, USB cable and power. Wait a minute for the pi to boot up.
- From a web browser enter in http://nanodlp.local (Mac and Linux). If you have Windows you may need to install Bonjour or you will need to know the IP address of the pi.xt
- You should see the nanodlp webpage displayed. Edit any preferences you want to change (password, wifi, profiles, etc).
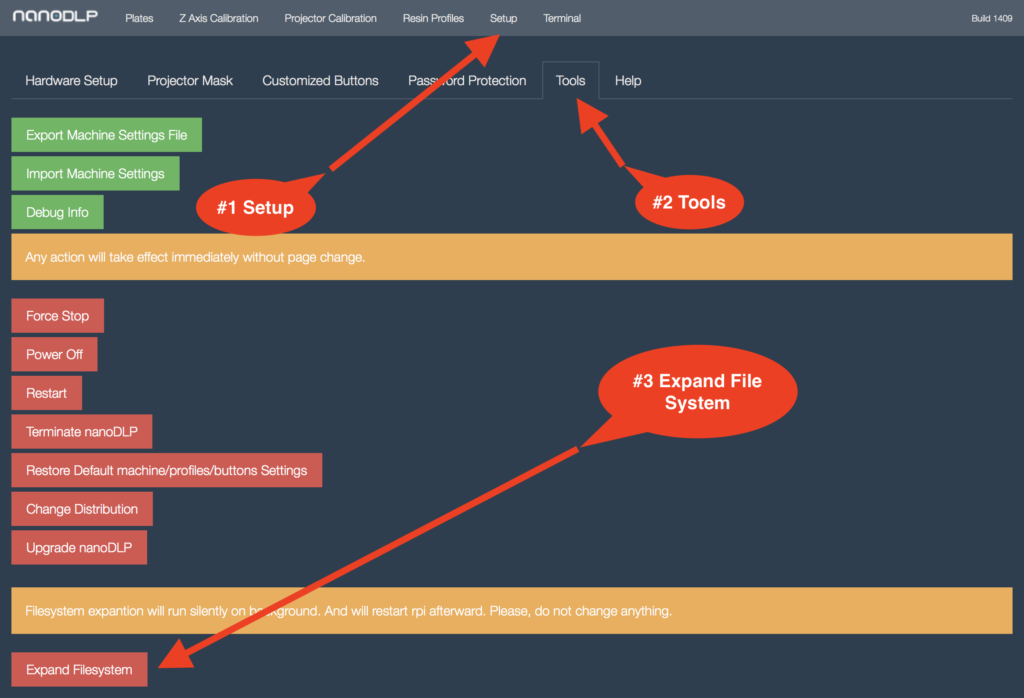
- Select Setup then Tools then Expand File system and wait a few minutes for the file system to expand and reboot then refresh your browser.
- The default raspberry pi login password has been changed to help with safety. It is recommended that you change it if the pi will be open to the outside world. The default username is “pi” and password is “nanodlp“. You should ssh in and change it: ssh pi@yourip then enter in nanodlp. Type in: passwd then press enter and then follow the instructions.

