
D7 NanoDLP Installation
This page gives some background on NanoDLP and how to make it work with the D7. If you want to skip right to installing NanoDLP and the updated D7 firmware skip to the Easy Install Page.
My favorite slicer / controller alternative for the D7 is to use a RaspberryPi3 and a program called nanoDLP. Please note that nanoDLP prefers that the motion control firmware on the D7 reports back when a move is completed. As of the time of this writing, the stock supplied firmware on the D7 does not provide the acknowledgement that nanoDLP is looking for. An updated firmware based on the latest Repetier firmware has been specifically modified and tested with the D7.
You will need a RaspberryPi3 to run Nanodlp on and a 8gb or greater SD card. The following kit contains a Pi3, proper power supply and enclosure or the pi3 board only. You can pick up pretty much any micro SD from a local drug store or order from one of the links below.
- Alternate Duplicator 7 firmware for use with nanoDLP and Creation Workshop Repetier D7 NanoDLP v1.3. The github source is here in the develop branch and is based on the latest develop branch of Repetier. Make sure you use the “Development” branch if you are compiling from source.
- In addition to supporting functions required for nanoDLP , this adds soft axis limits, EEPROM configuration via gcode for acceleration and speeds, and also with v1.3 allows the second 12V MOSFET controlled output to be controlled via M106 P1 SXX commands. This will turn on the second fan automatically when the UV is first turned on then will stay on until you issue M107 P1. If you would like your fan to run all the time then add M106 P1 S255 to the nanodlp boot gcode section..
- We removed the z_move_comp messages from every command except movement commands so the resin profiles will need to have the [[WaitForDoneMessage]] tags removed from everywhere except after the G1 Zxxx and G28 P1 commands. Here is a modified Printer Profile and a modified Resin Profile as an example of what to change (if you are using the latest nanodlp pi image nanodlp_d7_0517.zip then you will not need to make these changes).
- Changes to Setup and Profiles for use with v1.3 D7 Nanodlp firmware:
- Printer Setup, Shutter Open Gcode:
M106 S255 - Printer Setup, Shutter Close Gcode:
M107 - Printer Setup, Start of Print Gcode:
M107
G90
G28 F400 P1
[[WaitForDoneMessage]]
G92 Z0
[[PositionSet 0]]
M17 - Printer Setup, Resume Print Gcode:
M107
G4 P30000
G90
G1 Z185 F300 P1
[[WaitForDoneMessage]]
M84 - Printer Setup, Stop Print Gcode:
M107
G4 P30000
G90
G1 Z185 F300 P1
[[WaitForDoneMessage]]
M84 - Resin Profiles (each profile), Before Layer Gcode:
G1 Z[[LayerPosition]] F[[ZSpeed]] P1
[[WaitForDoneMessage]]
[[PositionSet [[LayerPosition]]]] - Resin Profiles (each profile), After Each Layer Gcode:
G1 Z{[[LayerPosition]]+[[ZLiftDistance]]} F{[[ZSpeed]]/5} P1
[[WaitForDoneMessage]]
[[PositionSet [[LayerPosition]]]]
- Older Nanodlp profiles for the D7 can be downloaded here and will give you a starting point to modify for your resins. The Gcode on the Printer Profiles should give you a good idea of what to use. These profiles only work with the modified Repetier firmware unless you remove the [[WaitForMessageDone]] messages and add hard coded delays.
- Machine profile for the Wanhao D7 – Extract and copy (using SCP or similar command or you can edit the existing profile and make it look like the images I am posting of the machine profile setup).
- Printing Profiles – Download and extract then you can import the default profiles into nanodlp using the Import option on the printing profiles screen.
- I2C LCD Python Script – Allows custom messages to be sent to the LCD. Extract and copy this file to the /usr/local/bin directory on the RPi3 (this will require some linux knowledge).
Video of Install Process
Video of D7 firmware update and nanoDLP installation from Evan Morgan. The D7 firmware is updated around the 2:30 minute mark.
Video install guide courtesy of Jim Spencer from the Nanodlp forums.
Here are some settings that may work with the nanoDLP program for controlling the D7 resin printer.
LCD SLA printer specs:
- photo mask: LCD 5.5 inch screen, 1440 x 2560 (537 PPI)
- Light: UV-LED 405 nm
- Print size: 121*68*150mm(XYZ)
- Resolution : 25 micron
- Print layer : 0.035mm-0.1mm
- Print Speed: 15mm-35 mm/Hour
- Resin: LCD/SLA printer resin
- signal input: HDMI
- PCB1: Arduino Mega 2560 (Sprinter firmware) + stepper motor driver
- PCB2: LCD controller (HDMI interface)
- X / Y Pixel size: 47.25 microns
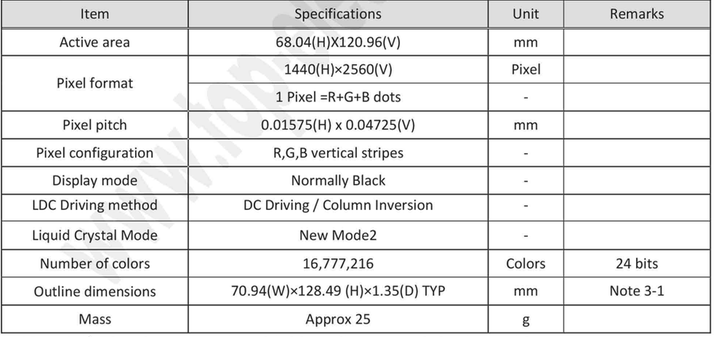
D7 LCD Specs
Configure Raspberry PI3 HDMI to support 1440×2560 pixel resolution:
Edit the boot config file after installing the software via the download image using this command: sudo nano /boot/config.txt then add the following lines to the bottom of the config file. This will rotate the screen so the layers and calibration screens are landscape, otherwise they will show as portrait:
# Wanhao D7 nanodlp config
# V1.0 3-feb-2017

# CAMERA SETTINGS ( 1 = ON, 0 = OFF)
#start_x=1
disable_camera_led=1

# DISPLAY SETTINGS
display_rotate=0x10000
hdmi_force_hotplug=1
hdmi_timings=1440 0 50 10 35 2560 0 4 2 2 0 0 0 50 0 198000000 0
hdmi_group=2
hdmi_mode=87
hdmi_pixel_freq_limit=500000000
hvs_priority=0x32ff
max_framebuffer_width=1440
max_framebuffer_height=2560
framebuffer_width=1440
framebuffer_height=2560
framebuffer_depth=24
framebuffer_ignore_alpha=1
config_hdmi_boost=4
gpu_mem=192
Add Pushover Notifications for Prints:
If you use the Pushover app / service then you can add Print Start and Print Complete notifications to NanoDLP with the use of a pushover bash script.
- Download and copy the pushover.sh script from github and put it in the /usr/local/bin directory on the pi.
- Make sure the script is marked as executable (sudo chmod +x /usr/local/bin/pushover.sh)
- Create the config directory if you want to add your pushover api key and token or you can specify it on the command line (see github for directions).
- sudo mkdir /root/.config
- sudo nano /root/.config/pushover.conf
- Add your api token and user key:
TOKEN="your application's token here"USER="your user/group key here" - Save file (CTRL-O then CTRL-X)
- Edit the NanoDLP Printer settings (Settings) and add these lines or what ever message you would like:
- Execute – Start of Print:
pushover.sh -p 1 -t "NanoDLP" "Printing started. [[TotalNumberOfLayers]] Total Layers ({[[LayerThickness]]*[[TotalNumberOfLayers]]})" - Execute – Print Stop
pushover.sh -p 1 -t "NanoDLP" "Printing stopped on Layer [[LayerNumber]] of [[TotalNumberOfLayers]]"
- Execute – Start of Print:
- Save Settings
Printer GCodes:
- G28 home axis (Fxxx parameter changes the speed of the homing)
- G1 X0 Y0 Z100 F300 move to position (0,0,100) (adding the P1 option will cause the move to wait before returning)
- M106 switch UV-LED on (adding P1 to the command controls the spare OUT port on the D7 controller)
- M107 switch UV-LED off
Printer Profiles JSON:
{
 "ProfileID": 2,
 "Title": "D7 default 100micron",
 "Desc": "",
 "ZStepWait": 1500,
 "SlowSectionHeight": 2,
 "SlowSectionStepWait": 225,
 "TopWait": 1,
 "WaitHeight": 2,
 "CureTime": 20,
 "DynamicCureTime": "",
 "DynamicSpeed": "",
 "DynamicLift": "",
 "Depth": 100,
 "WaitBeforePrint": 0.8,
 "WaitAfterPrint": 0.01,
 "JumpHeight": 0,
 "JumpPerLayer": 0,
 "SupportTopWait": 3.3,
 "SupportWaitHeight": 2.5,
 "SupportLayerNumber": 5,
 "SupportCureTime": 100,
 "SupportDepth": 100,
 "SupportWaitBeforePrint": 12,
 "SupportWaitAfterPrint": 3,
 "LowQualityCureTime": 12.6,
 "LowQualitySkipPerLayer": 0,
 "XYRes": 0,
 "XYResPerc": 0,
 "ZResPerc": 0,
 "Color": "#ffffff",
 "SyscallBeforeLayer": "",
 "ShieldBeforeLayer": "G1 Z[[LayerPosition]] F[[ZSpeed]] P1 ; Move to layer position\r\n[[WaitForDoneMessage]]\r\nG4 P1\r\n[[WaitForDoneMessage]]",
 "SyscallAfterLayer": "",
 "ShieldAfterLayer": "G1 Z{[[LayerPosition]]+[[ZLiftDistance]]} F{[[ZSpeed]]/3} P1 ; Lift to wait position\r\n[[WaitForDoneMessage]]\r\nG4 P1\r\n[[WaitForDoneMessage]]",
 "PixelDiming": 0,
 "DimAmount": 0,
 "DimWall": 0,
 "DimSkip": 0,
 "IgnoreMask": 0,
 "ShieldStart": "",
 "ShieldResume": "",
 "ShieldFinish": ""
}


{
 "ProfileID": 1,
 "Title": "D7 default 65micron",
 "Desc": "",
 "ZStepWait": 2000,
 "SlowSectionHeight": 2,
 "SlowSectionStepWait": 225,
 "TopWait": 1,
 "WaitHeight": 2,
 "CureTime": 12,
 "DynamicCureTime": "",
 "DynamicSpeed": "",
 "DynamicLift": "",
 "Depth": 65,
 "WaitBeforePrint": 0.8,
 "WaitAfterPrint": 0.01,
 "JumpHeight": 0,
 "JumpPerLayer": 0,
 "SupportTopWait": 3.3,
 "SupportWaitHeight": 2.5,
 "SupportLayerNumber": 5,
 "SupportCureTime": 90,
 "SupportDepth": 65,
 "SupportWaitBeforePrint": 12,
 "SupportWaitAfterPrint": 3,
 "LowQualityCureTime": 12.6,
 "LowQualitySkipPerLayer": 0,
 "XYRes": 0,
 "XYResPerc": 0,
 "ZResPerc": 0,
 "Color": "#ffffff",
 "SyscallBeforeLayer": "",
 "ShieldBeforeLayer": "G1 Z[[LayerPosition]] F[[ZSpeed]] P1 ; Move to layer position\r\n[[WaitForDoneMessage]]\r\nG4 P1\r\n[[WaitForDoneMessage]]",
 "SyscallAfterLayer": "",
 "ShieldAfterLayer": "[[Exec lcdmsg.py --msg=\"Lifting to {[[LayerPosition]]+[[ZLiftDistance]]}\" --line=2]]\r\nG1 Z{[[LayerPosition]]+[[ZLiftDistance]]} F{[[ZSpeed]]/3} P1 ; Lift to wait position\r\n[[WaitForDoneMessage]]\r\nG4 P1\r\n[[WaitForDoneMessage]]",
 "PixelDiming": 0,
 "DimAmount": 0,
 "DimWall": 0,
 "DimSkip": 0,
 "IgnoreMask": 0,
 "ShieldStart": "",
 "ShieldResume": "",
 "ShieldFinish": ""
}
Machine Profile JSON:
{
	"ID": 1,
	"Name": "NanoDLP D7",
	"Port": 80,
	"ZAxisPin": 0,
	"DirectionPin": 10,
	"LimitPin": 18,
	"WaitPin": 0,
	"EnablePin": 0,
	"EnablePinState": 0,
	"FaultPin": 0,
	"FaultPinState": 0,
	"ShutterPin": 11,
	"ShutterType": 0,
	"ShutterMode": 1,
	"ShutterOpen": 500,
	"ShutterClose": 2500,
	"ShutterOpenGcode": "M106 S255\r\n[[GPIOHigh 26]]\r\n[[WaitForDoneMessage]]\r\n",
	"ShutterCloseGcode": "M107\r\n[[GPIOLow 26]]\r\n[[WaitForDoneMessage]]\r\n",
	"ShutterSignalLength": 1000,
	"MaxSpeed": 3000,
	"MinSpeed": 1000,
	"StartupSpeed": 100,
	"StopPositionMm": 10,
	"ResinDistanceMm": 5,
	"ZAxisHeight": 3000,
	"MotorDegree": 1.8,
	"MicroStep": 8,
	"LeadscrewPitch": 8,
	"LCDType": 1,
	"LCDAdress": 56,
	"ShieldType": 1,
	"ShieldEncoding": 0,
	"ShieldI2CAddress": 0,
	"ShieldUSBAddress": "/dev/ttyACM0",
	"ShieldSpeed": 115200,
	"ShieldBootup": "M107",
	"ShieldStart": "M107\r\n[[WaitForDoneMessage]]\r\nG90\r\n[[WaitForDoneMessage]]\r\nG28 F400\r\n[[WaitForDoneMessage]]\r\nG92 Z0\r\n[[WaitForDoneMessage]]\r\n[[PositionSet 0]]\r\nM17\r\n [[WaitForDoneMessage]]",
	"ShieldResume": "",
	"ShieldFinish": "M107\r\nG04 F30000\r\nG90\r\nG1 Z193 F300\r\nM84",
	"ShieldAxisMode": 0,
	"ShieldPositioning": 0,
	"ManualMoveGcode": "G1 Z[[Position]]",
	"SyscallStart": "",
	"SyscallFinish": "",
	"CameraFrequency": 0,
	"CameraStore": 0,
	"CameraCommand": "-w 1296 -h 972 --timeout 700 --awb sun",
	"ShutdownPin": 7,
	"ProjectorWidth": 1440,
	"ProjectorHeight": 2560,
	"ProjectorType": 0,
	"ProjectorPowerCycle": 0,
	"ProjectorSpeed": 9600,
	"ProjectorAddress": "/dev/ttyUSB0",
	"ProjectorOn": "* 0 IR 001",
	"ProjectorOff": "* 0 IR 002",
	"ProjectorLampQuery": "",
	"ProjectorLampEffect": 0,
	"ProjectorOnSyscall": "",
	"ProjectorOffSyscall": "",
	"ProjectorWarmup": 0,
	"XYRes": 47.07,
	"Username": "",
	"Password": "",
	"ViewUsername": "",
	"ViewPassword": "",
	"OnlineKey": "",
	"Mute": 0,
	"DisplayID": 0,
	"DefaultProfile": 0,
	"CustomValues": null,
	"WifiType": "",
	"WifiPass": "",
	"WifiSSID": ""
}